AOP在Nest中的应用#
1、中间件#
中间件是 Express 里的概念,Nest 的底层默认是 Express,它在请求流程中的位置大致如下:

中间件可以在路由处理程序之前或者之后插入需要执行的任务,Nest做了进一步细分,主要分为全局中间件和局部中间件
我们可以通过命令**nest g mi [中间件名称]**直接来创建中间件,比如nest g mi person就会自动帮我们在person文件夹下创建person.middleware.ts文件
person.middleware.ts
import { Injectable, NestMiddleware } from '@nestjs/common'import { Request, Response, NextFunction } from 'express'
@Injectable()export class PersonMiddleware implements NestMiddleware { use(req: Request, res: Response, next: NextFunction) { console.log('before 中间件 ---' + req.url) next() console.log('after 中间件 ---' + res.statusCode) }}当然,默认生成的参数req,res类型都是any,next就是一个默认函数() => void我们可以加上express对应的相关类型。
我们可以在person模块中调用中间件
person.module.ts
import { MiddlewareConsumer, Module, NestModule } from '@nestjs/common'import { PersonService } from './person.service'import { PersonController } from './person.controller'import { PersonMiddleware } from './person.middleware'
@Module({  controllers: [PersonController],  providers: [PersonService],})export class PersonModule implements NestModule {  configure(consumer: MiddlewareConsumer) {    consumer.apply(PersonMiddleware).forRoutes(PersonController)  }}
当然,我们也可以像下面一样,指定特定的路由:
import {  MiddlewareConsumer,  Module,  NestModule,  RequestMethod,} from '@nestjs/common'import { PersonService } from './person.service'import { PersonController } from './person.controller'import { PersonMiddleware } from './person.middleware'
@Module({  controllers: [PersonController],  providers: [PersonService],})export class PersonModule implements NestModule {  configure(consumer: MiddlewareConsumer) {    consumer.apply(PersonMiddleware).forRoutes({      path: '/person',      method: RequestMethod.GET,    })  }}
当我们访问/person时,后端打印如下效果:
before 中间件 ---/personperson controllerafter 中间件 ---200在Nest中,类中间件不仅可以处理HTTP请求和响应,更重要的是,它能够实现依赖注入。这意味着我们可以在中间件中注入特定的依赖项,并且调用这些依赖项内部的方法。比如:
import { Inject, Injectable, NestMiddleware } from '@nestjs/common'import { Request, Response, NextFunction } from 'express'import { UserService } from 'src/user/user.service'import { PersonService } from './person.service'
@Injectable()export class PersonMiddleware implements NestMiddleware {  @Inject(PersonService)  private personService: PersonService
  use(req: Request, res: Response, next: NextFunction) {    console.log('before 中间件 ---' + req.url)    console.log('调用注入的服务 ---' + this.personService.findAll())    next()    console.log('after 中间件 ---' + res.statusCode)  }}
当然,如果不需要依赖注入的话,也能使用轻量的函数中间件,就和定义普通函数差别不大
export function PersonMiddleware( req: Request, res: Response, next: NextFunction) { console.log('before 函数中间件 ---' + req.url) next() console.log('after 函数中间件 ---' + res.statusCode)}除了在局部引用,也能直接在全局引用,作为全局中间件使用,比如,我创建一个logger中间件,nest g mi logger
import { Injectable, NestMiddleware } from '@nestjs/common'import { Request, Response, NextFunction } from 'express'@Injectable()export class LoggerMiddleware implements NestMiddleware { use(req: Request, res: Response, next: NextFunction) { console.log('before 全局中间件 ---' + req.url) next() console.log('after 全局中间件 ---' + res.statusCode) }}在main.ts中全局引入
import { NestFactory } from '@nestjs/core'import { AppModule } from './app.module'import { LoggerMiddleware } from './logger/logger.middleware'
async function bootstrap() { const app = await NestFactory.create(AppModule) app.use(new LoggerMiddleware().use) await app.listen(8088)}bootstrap()2、守卫#
守卫的职责一般很明确,通常用于权限、角色等授权操作,守卫所在的位置与中间件类似,可以对请求进行拦截和过滤,其实,Guard 就可以理解为路由守卫的意思,可以用于在调用某个 Controller 之前判断权限,返回 true 或者 false 来决定是否放行
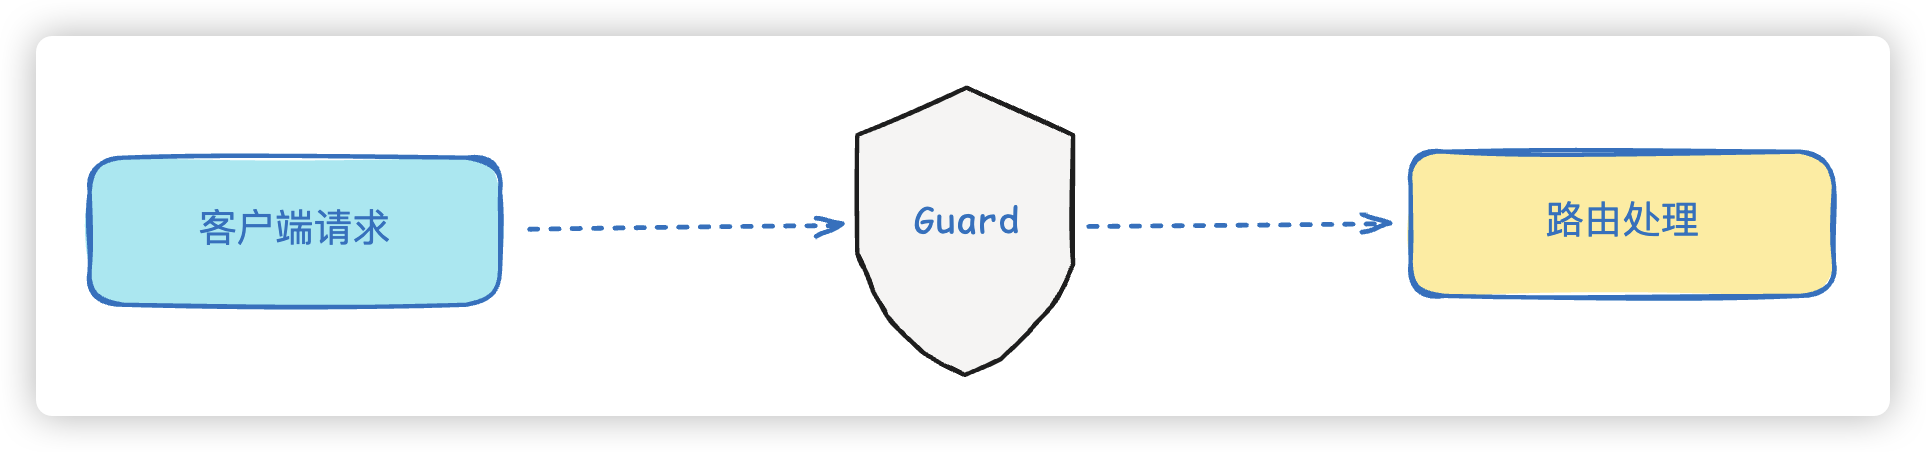
守卫在调用路由程序之前返回true或者false来判断是否通行,同样分为全局守卫和局部守卫
同样,我们可以使用命令**nest g gu [守卫名称]**来创建守卫模块,比如:nest g gu person就会自动帮我们在person文件夹下创建person.guard.ts文件
要作为一个守卫,必须实现CanActive接口中的canActivate()方法
person.guard.ts
import { CanActivate, ExecutionContext, Injectable } from '@nestjs/common'import { Observable } from 'rxjs'
@Injectable()export class PersonGuard implements CanActivate { canActivate( context: ExecutionContext ): boolean | Promise<boolean> | Observable<boolean> { console.log('person guard') return true }}如果我们进行局部绑定,可以直接在Controller类上添加装饰器@UseGuards
@Controller('person')@UseGuards(PersonGuard)export class PersonController {......}这样,当我们访问/person时,打印如下效果:
before 中间件 ---/personperson guardafter 中间件 ---200person controller但是如果在canActivate方法中返回的是false,就会是如下效果
{"message":"Forbidden resource","error":"Forbidden","statusCode":403}Controller 本身不需要做啥修改,却透明的加上了权限判断的逻辑,这就是 AOP 架构的好处
而且,就像 Middleware 支持全局级别和路由级别一样,Guard 也可以全局启用
async function bootstrap() { const app = await NestFactory.create(AppModule); app.use(new LoggerMiddleware().use); app.useGlobalGuards(new PersonGuard()); await app.listen(8088);}bootstrap();这样每个路由都会应用这个 Guard。
但是,注意,这种方式是通过自己new的 Guard 实例,不在 IoC 容器里。这会造成什么问题呢?由于没有在IoC容器中所以,当然无非获取从容器中注入的内容,比如像下面的代码:
@Injectable()export class PersonGuard implements CanActivate {  @Inject(PersonService)  private personService: PersonService
canActivate( context: ExecutionContext ): boolean | Promise<boolean> | Observable<boolean> { console.log('person guard ---' + this.personService.findAll()) return true }}在PersonGuard中引入了PersonService,但是这需要从IoC容器中进行注入,而我们的PersonGuard是自己new出来的,并没有被IoC容器所托管,因此,在这里是用不了PersonService对象的,会在后台直接报错,直接前台提示500错误。
ERROR [ExceptionsHandler] Cannot read properties of undefined (reading 'findAll')
{"statusCode":500,"message":"Internal server error"}所以,Nest还给我们提供了另外一种全局注册方式,在 AppModule 里声明,当然记得把之前new的Guard实例注释掉:
import { APP_GUARD } from '@nestjs/core';import { PersonGuard } from './person/person.guard';
@Module({ imports: [UserModule, PersonModule], controllers: [AppController, PersonController], providers: [ AppService, PersonService, { provide: APP_GUARD, useClass: PersonGuard, }, ],})export class AppModule {}3、拦截器#
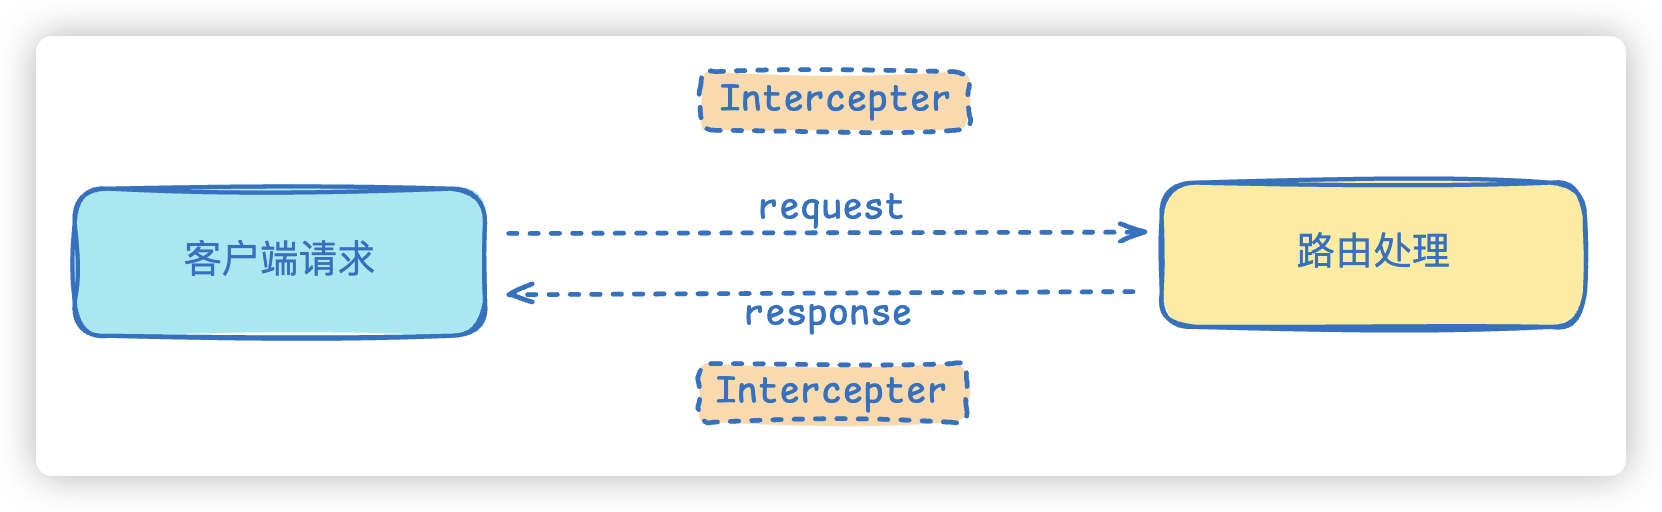
拦截器不同于中间件和守卫,它在路由请求之前和之后都可以进行逻辑处理,能够充分操作request和response对象。拦截器通常用于记录请求日志、转换或者格式化相应数据等等
我们现在可以创建一个简单的拦截器,比如使用nest g itc timeout命令,直接帮我们创建一个timeout文件夹,并且创建timeout.interceptor.ts的拦截器文件。
拦截器通过@Injectable()来声明,并且需要实现NestInterceptor接口的intercept方法,接收两个参数:ExecutionContext上下文对象和CallHandler处理程序
ExecutionContext上下文对象能够访问当前请求的详细信息,包括路由、HTTP方法、请求体以及响应体数据,以下几个场景会用到它:
1、记录请求和响应日志,用于追踪、监控和调试
2、进行身份验证和权限检查
3、根据请求头或路由信息来设置缓存策略
4、修改或者转换响应数据,比如对响应进行包装、格式化、加密等操作
CallHandler实现了handle方法,必须在拦截器中调用handle方法,才能执行路由处理方法
import {  CallHandler,  ExecutionContext,  Injectable,  NestInterceptor,} from '@nestjs/common'import { Observable } from 'rxjs'
@Injectable()export class TimeoutInterceptor implements NestInterceptor { intercept(context: ExecutionContext, next: CallHandler): Observable<any> { console.log('进入拦截器') return next.handle() }}类似于守卫,拦截器可以设置为作用于某个控制器,或者某个控制器的某个方法,当然,也能作用于整个应用中
比如作用于某个控制器上:
@Controller('person')@UseInterceptors(TimeoutInterceptor)export class PersonController {......}比如作用于某个方法上:
@Get()@UseInterceptors(TimeoutInterceptor)findAll() { console.log('person controller'); return this.personService.findAll();}也能作用于全局,和守卫的使用方式基本一致
async function bootstrap() { const app = await NestFactory.create(AppModule) // app.use(new LoggerMiddleware().use); // app.useGlobalGuards(new PersonGuard()); app.useGlobalInterceptors(new TimeoutInterceptor()) await app.listen(8088)}bootstrap()当然,这里使用new方式的缺陷,也和守卫是一个道理,我们同样可以使用另外的方式
@Module({ imports: [UserModule, PersonModule], controllers: [AppController, PersonController], providers: [ AppService, PersonService, // { // provide: APP_GUARD, // useClass: PersonGuard, // }, { provide: APP_INTERCEPTOR, useClass: TimeoutInterceptor, }, ],})export class AppModule {}拦截器的请求和响应流程遵循先进后出的顺序。请求首先通过全局拦截器,然后是控制器级别的拦截器,最后是路由级别的拦截器进行处理。而响应流程则相反,从路由级别的拦截器开始,经过控制器级别的拦截器,最终到达全局拦截器。
这样的设计允许在处理请求的任何阶段,包括由管道、控制器或服务抛出的错误
intercept方法返回Observable对象,而Observable对象位于RxJS库中
**RxJS**是一个用于处理异步数据流的JavaScript·库。你可以把它理解为一个管道,它可以帮你更方便的处理各种事件和数据流,当然我们没必要增加心智负担,可以更直白的认为它就是和前端的Lodash工具库差不多的一个库。
Controller 之前之后的处理逻辑可能是异步的,所以可以使用 RxJS 的各种 operator
它是由数据源产生数据,经过一系列 operator 的处理,最后传给接收者。
这个数据源叫做 observable。
RxJS 的核心思想是通过创建和订阅 Observable,使得你能够以同步的方式处理原本异步的事件流。这些异步操作通过 Observable 的内建机制被包装,并且可以利用 RxJS 提供的操作符进行组合、转换和调度。
Observable 的工作原理
- 创建 Observable: 你可以使用
new Observable()来创建一个Observable实例,或者使用 RxJS 提供的各类创建操作符(如of(),from(),interval())来创建。 - 订阅 Observable: 你需要调用
subscribe()方法来订阅一个Observable,订阅的过程会启动 Observable 发出数据流,subscribe()会指定如何处理这些数据(如通过next处理值,error处理错误,complete处理流结束)。 - 发出数据流: 当你订阅了
Observable后,它会根据内部逻辑(如事件、定时器、HTTP 请求等)按顺序发出数据。当数据发出时,next()被调用。 - 终止流: 你可以通过
complete()来表示数据流的结束,或者通过error()来表示发生了错误。流结束后就不再发出新的数据了。
import { Observable } from 'rxjs'
// 创建一个简单的 Observableconst observable = new Observable((subscriber) => {  subscriber.next('Hello')  subscriber.next('World')  subscriber.complete() // 表示流结束})
// 订阅 Observableobservable.subscribe({ next(value) { console.log(value) }, // 处理数据 complete() { console.log('Complete!') }, // 处理完成})当然也可以使用RxJS提供的操作符来创建Observable
const observable = of(1, 2, 3, 4, 5)
observable.subscribe({  next(value) {    console.log(value)  }, // 处理每个值  complete() {    console.log('Complete!')  }, // 流结束})
你可以把 of(1, 2, 3, 4, 5) 想象成一个依次“发射”这些值的事件流。每当这些值被发射时,它们会被 subscribe() 里面的 next 处理。
同样,也能把异步事件源转换为Observable
import { from } from 'rxjs'
const promise = new Promise((resolve) =>  setTimeout(() => resolve('Hello World'), 1000))
const observable = from(promise) // 将 Promise 转化为 Observable
observable.subscribe({  next(value) {    console.log(value)  },  complete() {    console.log('Complete!')  },})
如果有多个promise还能使用RxJs提供的各种操作符来处理
import { from } from 'rxjs'import { concatMap } from 'rxjs/operators'
const promise1 = new Promise((resolve) =>  setTimeout(() => resolve('Hello'), 500))const promise2 = new Promise((resolve) =>  setTimeout(() => resolve('World'), 1000))const promise3 = new Promise((resolve) => setTimeout(() => resolve('!'), 1500))
const promises = [promise1, promise2, promise3]
from(promises) // 创建一个 Observable,依次发出每个 Promise  .pipe(    concatMap((promise) => from(promise)) // 串行执行 Promise  )  .subscribe({    next(value) {      console.log(value)    },    complete() {      console.log('Complete!')    },  })
如果你希望多个 Promise 并发执行(同时发出值),你可以使用 forkJoin
forkJoin([promise1, promise2, promise3]) // 并发执行所有 Promise .subscribe({ next(values) { console.log(values) }, // values 是每个 Promise 的结果的数组 complete() { console.log('Complete!') }, })除此之外,还提供了其他非常多的**操作符**,我们可以来试试效果
import { of, filter, map, tap } from 'rxjs'
of(1, 2, 3, 4, 5) .pipe(map((x) => x * x)) .pipe(filter((x) => x % 2 !== 0)) .subscribe((v) => console.log(`打印: ${v}`))创建另外一个interceptor来试试,比如nest g itc auth
import {  CallHandler,  ExecutionContext,  Injectable,  NestInterceptor,} from '@nestjs/common'import { catchError, filter, map, Observable, tap, toArray } from 'rxjs'
@Injectable()export class AuthInterceptor implements NestInterceptor {  intercept(context: ExecutionContext, next: CallHandler): Observable<any> {    // 请求处理之前打印日志    console.log('before interceptor')    return next.handle().pipe(      // 将用户名转换为大写      map((data) => data.toUpperCase()),
      // 过滤出数据中包含A的数据      filter((data) => data.includes('a')),
      // 打印处理后的数据      tap((data) => console.log('after interceptor', data)),
      // 转换为数组      toArray(),
// 使用catchError处理错误 catchError((err) => { console.log('error interceptor', err) throw new Error(err) }) ) }}在controller中传递数据
@Get('name') @UseInterceptors(AuthInterceptor) findName() { console.log('进入name---'); return from(['hello', 'worldA', 'abc']); }4、管道#
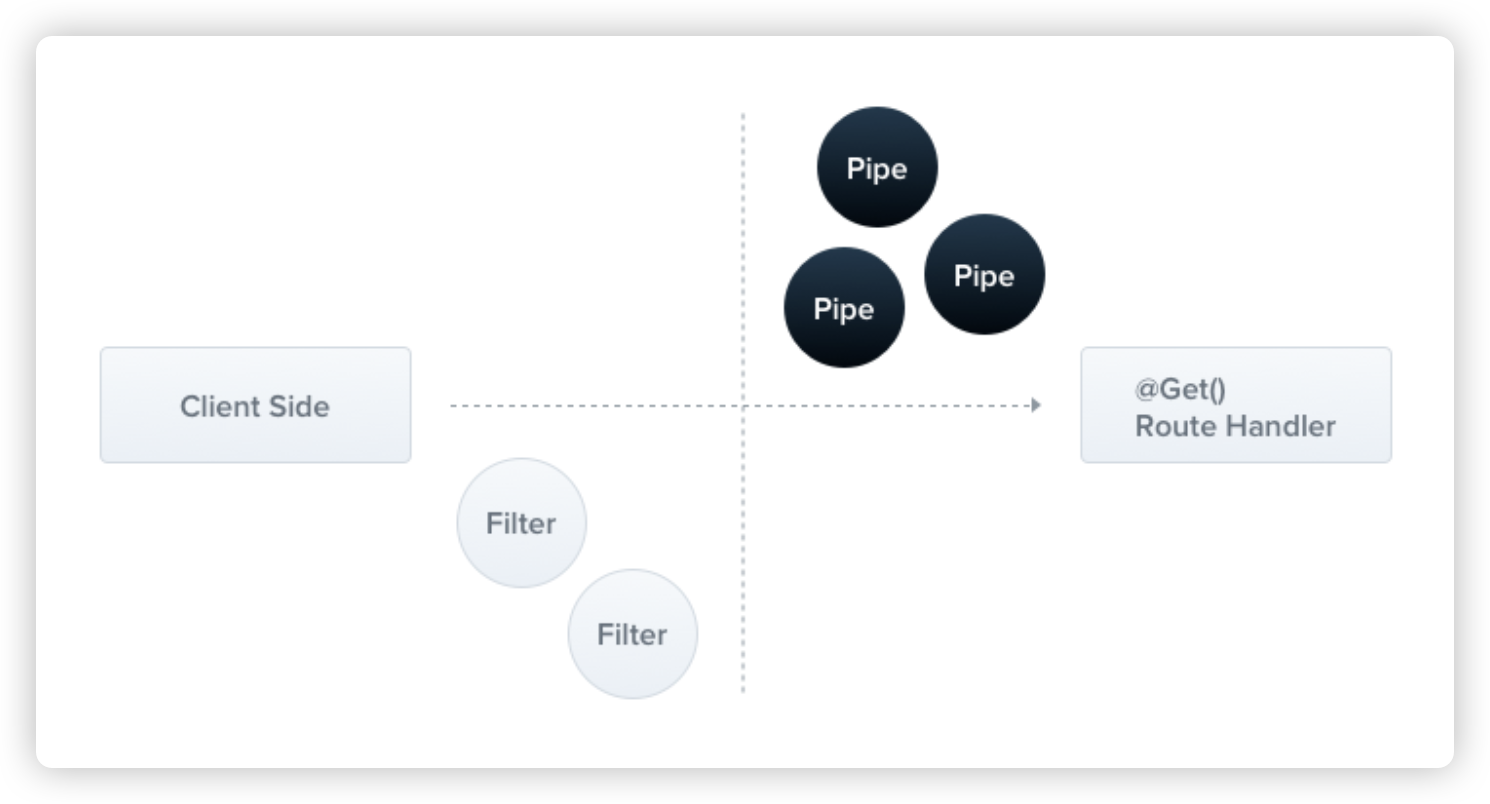
Pipe 就是管道的意思,主要的作用就是解析和验证请求数据。
在后端开发中,数据库表的字段类型在创建时就已经被明确定义了,任何不符合预期类型的数据保存操作都会导致错误。为了确保传入的数据满足预期的格式和规范,Nest会在客户端发起请求的时候,将请求数据传递给管道进行预处理。这些预处理操作包括数据验证、转换或者过滤等等,以确保数据的准确性。处理之后的数据会被传递给路由处理程序。
通常情况下,我们会将管道绑定在方法参数上,这样管道就会与特定的路由方法关联起来了,这种方式称为参数级别管道。当然,管道也能绑定在全局作用域,使其适用于每个控制器和路由方法。
用 nest cli 命令创建一个pipe,nest g pipe validate --no-spec --flat
Pipe 需要要实现 PipeTransform 接口,并实现 transform 方法
import {  ArgumentMetadata,  BadRequestException,  Injectable,  PipeTransform,} from '@nestjs/common'
@Injectable()export class ValidatePipe implements PipeTransform {  transform(value: any, metadata: ArgumentMetadata) {    if (Number.isNaN(parseInt(value))) {      throw new BadRequestException(`参数${metadata.data}错误`)    }
    return typeof value === 'number' ? value : parseInt(value)  }}
在controller中
@Delete(':id')remove(@Param('id', ValidatePipe) id: string) { console.log('person delete ---' + id) return this.personService.remove(+id);}我们可以使用apifox或者postman测试一下,如果传递错误的参数,也就是id不是数字或者不能转换为数字,直接报出下面的错误:
{ "message": "参数id错误", "error": "Bad Request", "statusCode": 400}当然,像这种比较简单的管道验证,nestjs已经帮我们内置了9种开箱即用的管道验证器:
ValidationPipeParseIntPipeParseFloatPipeParseBoolPipeParseArrayPipeParseUUIDPipeParseEnumPipeDefaultValuePipeParseFilePipeParseDatePipe
这些自定义管道,都是在@nestjs/common包中,比如上面我们自定义的Pipe完全就可以使用ParseIntPipe替换
@Delete(':id') remove(@Param('id', ParseIntPipe) id: string) { console.log('person delete ---' + id); return this.personService.remove(+id); }同样,如果传递错误的参数,比如127.0.0.1:8088/person/abc,就会提示如下的错误。
{ "message": "Validation failed (numeric string is expected)", "error": "Bad Request", "statusCode": 400}当然,这种自带的管道验证,错误响应式默认定义的,我们当然也能自定义,验证器允许传递下面两个参数
1、errorHttpStatusCode:验证器失败时抛出的HTTP状态码,默认为400(错误请求)
2、exceptionFactory:工厂函数,用于接收错误信息并返回相应的错误对象
比如:
@Delete(':id') remove( @Param( 'id', new ParseIntPipe({ errorHttpStatusCode: HttpStatus.NOT_ACCEPTABLE }), ) id: string, ) { console.log('person delete ---' + id); return this.personService.remove(+id); }}这样,错误的时候,就会报出下面的信息:
{ "message": "Validation failed (numeric string is expected)", "error": "Not Acceptable", "statusCode": 406}其中HttpStatus同样出自@nestjs/common包,是一个枚举
export declare enum HttpStatus { CONTINUE = 100, SWITCHING_PROTOCOLS = 101, PROCESSING = 102, EARLYHINTS = 103, OK = 200, CREATED = 201, ACCEPTED = 202, NON_AUTHORITATIVE_INFORMATION = 203, NO_CONTENT = 204, RESET_CONTENT = 205, PARTIAL_CONTENT = 206, AMBIGUOUS = 300, MOVED_PERMANENTLY = 301, FOUND = 302, SEE_OTHER = 303, NOT_MODIFIED = 304, TEMPORARY_REDIRECT = 307, PERMANENT_REDIRECT = 308, BAD_REQUEST = 400, UNAUTHORIZED = 401, PAYMENT_REQUIRED = 402, FORBIDDEN = 403, NOT_FOUND = 404, METHOD_NOT_ALLOWED = 405, NOT_ACCEPTABLE = 406, PROXY_AUTHENTICATION_REQUIRED = 407, REQUEST_TIMEOUT = 408, CONFLICT = 409, GONE = 410, LENGTH_REQUIRED = 411, PRECONDITION_FAILED = 412, PAYLOAD_TOO_LARGE = 413, URI_TOO_LONG = 414, UNSUPPORTED_MEDIA_TYPE = 415, REQUESTED_RANGE_NOT_SATISFIABLE = 416, EXPECTATION_FAILED = 417, I_AM_A_TEAPOT = 418, MISDIRECTED = 421, UNPROCESSABLE_ENTITY = 422, FAILED_DEPENDENCY = 424, PRECONDITION_REQUIRED = 428, TOO_MANY_REQUESTS = 429, INTERNAL_SERVER_ERROR = 500, NOT_IMPLEMENTED = 501, BAD_GATEWAY = 502, SERVICE_UNAVAILABLE = 503, GATEWAY_TIMEOUT = 504, HTTP_VERSION_NOT_SUPPORTED = 505,}再比如我们可以定义工厂函数
@Delete(':id')remove( @Param( 'id', new ParseIntPipe({ exceptionFactory: (error: string) => { throw new HttpException('参数id类型错误', HttpStatus.BAD_REQUEST); }, }), ) id: string,) { console.log('person delete ---' + id); return this.personService.remove(+id);}如果传递错误参数,提示下面的错误:
{ "statusCode": 400, "message": "参数id类型错误"}当然上面只是对某个参数生效,Pipe也能对整个 Controller 都生效
@Controller('person')@UsePipes(ParseIntPipe)export class PersonController {......}或者全局都生效
async function bootstrap() { const app = await NestFactory.create(AppModule) // app.use(new LoggerMiddleware().use); // app.useGlobalGuards(new PersonGuard()); // app.useGlobalInterceptors(new TimeoutInterceptor()); app.useGlobalPipes(new ParseIntPipe()) await app.listen(8088)}bootstrap()另外的方式:
@Module({ imports: [UserModule, PersonModule], controllers: [AppController, PersonController], providers: [ AppService, PersonService, // { // provide: APP_GUARD, // useClass: PersonGuard, // }, // { // provide: APP_INTERCEPTOR, // useClass: TimeoutInterceptor, // }, { provide: APP_PIPE, useClass: ParseIntPipe, }, ],})export class AppModule {}5、过滤器#
nest中最常见的是HTTP异常过滤器,通常用于在后端服务发生异常时向客户端报告异常的类型,目前内置的HTTP异常包括下面几种,它们全部也都包含在@nestjs/common包中:
BadRequestExceptionUnauthorizedExceptionNotFoundExceptionForbiddenExceptionNotAcceptableExceptionRequestTimeoutExceptionConflictExceptionGoneExceptionHttpVersionNotSupportedExceptionPayloadTooLargeExceptionUnsupportedMediaTypeExceptionUnprocessableEntityExceptionInternalServerErrorExceptionNotImplementedExceptionImATeapotExceptionMethodNotAllowedExceptionBadGatewayExceptionServiceUnavailableExceptionGatewayTimeoutExceptionPreconditionFailedException
其实我们在 自定义pipe 里抛的错误,能够返回 400 的响应,就是 Exception Filter 处理的。
当然,我们也能自定义Filter,比如使用下面的命令
nest g filter myException --no-spec --flat稍微修改一下生成的filter代码
import {  ArgumentsHost,  Catch,  ExceptionFilter,  HttpException,} from '@nestjs/common'import { Response, Request } from 'express'
@Catch(HttpException)export class MyExceptionFilter implements ExceptionFilter {  catch(exception: HttpException, host: ArgumentsHost) {    // 指定传输协议    const ctx = host.switchToHttp()    // 获取响应对象(注意这里的Response是express的Response)    const response = ctx.getResponse<Response>()    // 获取请求对象(注意这里的Request是express的Request)    const request = ctx.getRequest<Request>()    // 获取状态码    const status = exception.getStatus()    // 获取异常信息    const message = exception.message
    let resMessage: string | Record<string, any> = exception.getResponse()
    console.log('---MyExceptionFilter---')
    if (typeof resMessage === 'object') {      resMessage = resMessage.message    }
    // 统一组装返回的数据格式    response.status(status).json({      statusCode: status,      message: resMessage || message,      path: request.url,      success: false,    })  }}
实现 ExceptionFilter 接口并实现catch 方法,就可以拦截异常了。
ArgumentsHost能够获取不同平台的传输协议上下文,用于访问request和response对象
@Catch()装饰器用于声明要拦截的异常类型,上面的例子使用的是HTTPException
异常过滤器同样可以应用于方法,整个控制器和全局。
比如,将自定义的异常运用到我们之前的删除方法上,如果传递的数据类型不正确
@Delete(':id')@UseFilters(MyExceptionFilter)remove(@Param('id', ParseIntPipe) id: string) { console.log('person delete ---' + id); return this.personService.remove(+id);}现在就报出下面的错误信息:
{ "statusCode": 400, "message": "Validation failed (numeric string is expected)", "path": "/person/abc", "success": false}作用于整个controller上
@Controller('person')// @UseGuards(PersonGuard)// @UseInterceptors(TimeoutInterceptor)// @UsePipes(ParseIntPipe)@UseFilters(MyExceptionFilter)export class PersonController {......}作用于全局
async function bootstrap() { const app = await NestFactory.create(AppModule); app.useGlobalFilters(new MyExceptionFilter()); await app.listen(8088);}bootstrap();注入的方式:
@Module({ imports: [UserModule, PersonModule], controllers: [AppController, PersonController], providers: [ AppService, PersonService, ...... { provide: APP_FILTER, useClass: MyExceptionFilter, }, ],})export class AppModule {}Nest与Express的关系#
前面我们用的Nest的 request、response 对象都特地强调了是引入express的
实际上,对于http请求响应的处理,Nest可以轻松的切换 express、fastify库,在源代码内部使用了适配器模式
我用简单的例子,给大家解释一下适配器模式,大家就知道了。
首先大家要知道,后端都是强类型的模式,比如我们用动物举例:
class Duck { quack(): void { console.log('鸭子:嘎嘎嘎') }}class Chicken { cluck(): void { console.log('鸡:咯咯咯') }}鸭子和鸡,是不同的类型,两者像现在这样是无法产生关联的。
但是就算国内与其他地区的插头一样,虽然规格不一样,但是只要我们有一个转接头,就能完美的适配不同地区的接口
因此,我可以创建一个接口:
interface Quackable { quack(): void}当我需要统一的动物叫声的时候,我可以像下面这些写一个方法:
function makeItQuack(animal: Quackable) { animal.quack()}makeItQuack方法的参数,是Quackable接口。
现在,无论是鸭还是鸡,我通过统一的适配器进行转换:
class AnimalAdapter implements Quackable {  private animal: any  private soundMethod: string
  constructor(animal: any, soundMethod: string) {    this.animal = animal    this.soundMethod = soundMethod  }
  quack(): void {    // 动态调用对应动物的叫声方法    if (this.soundMethod in this.animal) {      this.animal[this.soundMethod]()    } else {      console.log('动物没有这个叫声方法!')    }  }}
这样,具体在使用的时候,我们就可以非常方便的进行替换
function makeItQuack(animal: Quackable) {  animal.quack()}
// 使用鸭子(通过适配器)const duck = new Duck()const duckAdapter = new AnimalAdapter(duck, 'quack')makeItQuack(duckAdapter) // 输出: 鸭子:嘎嘎嘎
// 使用鸡(通过适配器)const chicken = new Chicken()const chickenAdapter = new AnimalAdapter(chicken, 'cluck')makeItQuack(chickenAdapter) // 输出: 鸡:咯咯咯所以,Nest对于请求响应的底层处理,就是通过这种适配器模式,可以非常方便的进行替换,到底是使用express,还是fastify,进本的情况如下图:

当然,默认Nest使用的express,如果你要使用fastify,导入fastify相应的包即可